The Facts About Bathroom Renovation Burnaby Uncovered
Table of ContentsThe Definitive Guide to Bathroom Renovation BurnabyBathroom Renovation Burnaby Things To Know Before You Get ThisThe Basic Principles Of Bathroom Renovation Burnaby The Only Guide to Bathroom Renovation BurnabySome Of Bathroom Renovation BurnabyThe Best Strategy To Use For Bathroom Renovation Burnaby
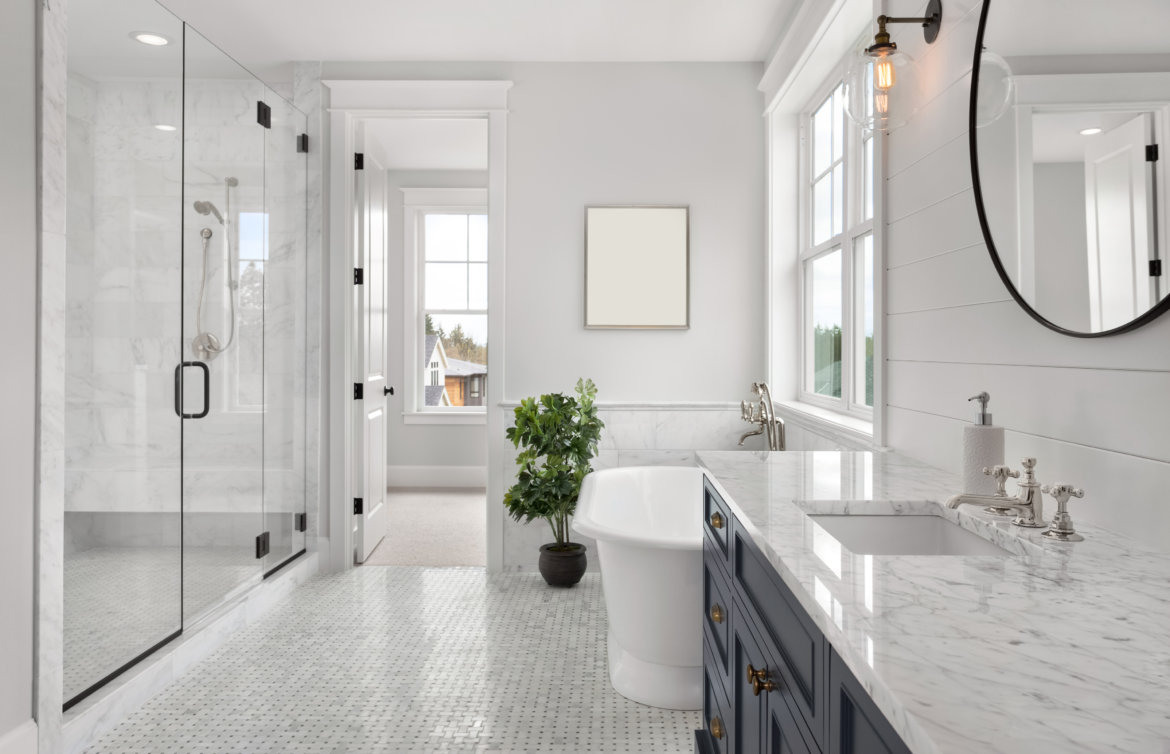
If you don't have the know just how to do this - hire a plumbing technician. All set to mount the shower frying pan. There are many choices available of kinds of pan materials. Polymer vs fiberglass vs cast iron - what to use? I picked an acrylic frying pan after much research leading me to believe acrylic was stronger as well as extra long lasting than fiberglass and also more economical than cast iron.In brief, nevertheless, you desire something that will not flex, flex and/or squeak when standing in the completed shower. If you have a standard sized area shower pans some are readily available at your neighborhood house improvement shop. Purchasing might be required so ensure to fit that into your timespan for renovating or this task will certainly drag out for months.
Mix a 40 lb bag of concrete according to package directions and pour equally on the tar paper where shower frying pan will certainly be. Place shower frying pan as well as press to level. I acquired a 4 foot degree to make certain this was precise. This is the last point you wish to be off.
Place in strainer plate. Add Tip, Ask Inquiry, Download and install While the concrete is drying under the shower pan tile the floor. Screw concrete board to the subfloor covering the entire area to get ready for tiling. I chose an italian porcelain rectangle-shaped light gray canvas ceramic tile. It resembles glossy canvas.
About Bathroom Renovation Burnaby
I acquired it from along with the mosaic ceramic tile for the shower. Making use of a 1/4 inch square trowel spread out a layer of thin collection (I used Mapei) on the back of one ceramic tile as well as press into location - bathroom renovation Burnaby.
I picked to purchase a ceramic tile saw to make my cuts however consult your neighborhood house renovation or equipment shops to see if you can lease them. If I leased one for 3 hours it would cost even more than acquiring one so I selected the least expensive choice and also currently have a tile saw handy for my following job.
Get rid of spacers and also mix grout according to package instructions. Considering that I had such a thin grout line I used (Kera Color S (sanded) Charcoal) as well as a cement trowel. Have a 5 gallon pail of water, a sponge and an old completely dry towel helpful. Grout off about nine square feet at a time pressing right into the grooves leaving no room or air pockets and remove as much excess cement as possible with a wet sponge.
You can use a completely dry towel to remove the film you see on the ceramic tile before it is totally dry. Now repaint the walls and ceiling. If you are attempting a shower room renovation you have painted walls and ceilings before.
10 Easy Facts About Bathroom Renovation Burnaby Explained

I was concerned regarding reducing these mosaic floor tile sheets on the ceramic tile saw given that they are gotten in touch with that waxy things however it worked fantastic and really did not abuse when applying stress to push the tile via the saw - bathroom renovation Burnaby. Let thin collection completely dry for 24 hr prior to grouting, I selected Kera Color U (unsanded) White cement.

This can be dangerous if not done appropriately. Don't zap yourself. I do not have images of this process. Just the completed mount. This is a Hinkley lighting fixture. Add Idea, Ask Inquiry, Download I ordered a vanity cabinet after seeing a flooring display screen at the neighborhood home enhancement shop.
We sent it back for a brand-new one. Do not be terrified to do this if you obtain something you do not such as.
The 8-Minute Rule for Bathroom Renovation Burnaby
Add attractive knobs if desired using offered design template. Add Suggestion, Ask Question, Download Run a line of caulk glue along the leading edges of the vanity cabinet and area sink on the top pressing right into location.
Check out evaluations when purchasing brand-new things. It is really practical to avoid troubles people have had. Re-install the commode using a brand-new wax seal. If you had to reduce any kind of part of the wall surface to make the sink fit currently is the time to take care of that with new drywall where it was harmed.
I did it myself. Adhere to directions to prevent any kind of leaks. Once again, not something you desire in a reno task. Suggestion - Take a more info here photo of the pvc pipeline prior to you remove it. This way you can rebuild it link after and also avoid purchasing brand-new. You will need to clean it extremely well.
The Ultimate Guide To Bathroom Renovation Burnaby
Take time with this as to not miss any locations. Once grout is completely dry caulk, with paintable caulk, around the ceiling, shower pan and also where the ceramic tile finishes on the walls. Wait 24 hours to apply cement sealant. Sealer is required to prevent wetness infiltration. You will additionally intend to use this to the flooring.
This can be hazardous otherwise done properly. Do not zap yourself. I do not have images of this process. Just the completed mount. This is a Hinkley light fixture. Add Idea, Ask Inquiry, Download I ordered a vanity cupboard after seeing a flooring display screen at the local house enhancement shop.
We sent it back for a brand-new one. Do not hesitate to do this if you get something you don't like. People agree to function with you to deal with a trouble. They concurred with us that the closet got on the orange side and not natural wood. Put the cabinet in location as well as shim if needed to level it.
Using screws (not offered with the review bathroom mattress topper) screw right into studs to safeguard. Include decorative knobs if desired making use of provided theme. Include Pointer, Ask Question, Download Run a line of caulk adhesive along the leading edges of the vanity cabinet and also place sink on the leading pushing right into area. This is a rectangle sink with a level base.
Bathroom Renovation Burnaby Fundamentals Explained
Review reviews when purchasing new items. It is extremely useful to prevent troubles individuals have had. Re-install the toilet using a brand-new wax seal. If you had to reduce any component of the wall surface to make the sink fit currently is the time to take care of that with new drywall where it was harmed.
Suggestion - Take a picture of the pvc pipe prior to you remove it. That means you can rebuild it after and also stay clear of buying new. You will certainly need to clean it really well.